
Gomexus Power Knobs Drill Fit
- Brian Demo
- Feb 25, 2022
- 5 min read
Last week, I showed you how the new direct fit knob went right onto the Shimano reel easily. This week, we step into the slightly more jarring idea of drilling out the post and installing a knob on my Daiwa Cross cast. Bottom line up front (BLUF for my military friends!): You have a little wiggle room for error, but it is very nice!

The Daiwa Cross cast reels that I picked up, thanks to Tony at FishGum, have proved to be a tremendous long cast reel for a not horrible price. It has handled everything I've thrown at it and survived without being field stripped and cleaned after almost a full year of use. The only thing I truly disliked about this reel was they installed a paddle handle instead of a knob. When you go over the 3K series size, I feel a knob is more user-friendly.
I was not too fond of the paddle-style because I didn't feel like I had a good grip, nor could I control the fish I wanted. I found myself grabbing the handle in between my pointer and index finger at my fist. The tips of my fingers on there didn't seem to get the job done. Another point is that all of my surf reels have knobs already installed on them, so this odd one of the lot added to my frustration. Thankfully, Gomexus came up with a solution for this problem.
When I was asked to test the knobs out for them, I cut away one of the paddles down to the post and sent in the measurements (don't worry, you won't have to do that!). This was part of the R&D that they were doing, and I knew (hoped at the time, if we were sincere) they were going to send me a replacement. After the replacements arrived, it was time to get to cutting.
Before you start following anything I'm about to say, I must preface it. I am not responsible for any damage you do to your reel. You take all responsibility for your actions if you're following this story. Continuing to read this is this consent, and you hold me harmless. Hopefully, that's legal enough for everyone. If you don't feel comfortable doing this, wait it out because something is coming soon that will help you.
Gomexus has a video out already showing how to do this process I'm about to talk about, so I'll defer to them. Check out the video right here, and that will show you what they did. If you're over 35, enjoy tunes. But I will add a few things that aren't in the video.
First, I used a vice and drill press. I liked the control since I tend to move angles a little, and that's not good with this. I started with a 5/32 bit to pop out the post from the rear side. I drilled it down about halfway and found that I could wobble it out of the handle. I made a mistake during the drilling that, thankfully, didn't turn out catastrophic. While I thought I was centered, I was actually off just a little and ended up drilling into the handle. If this happens to you, it will be ok! Just so long as you didn't drill half the post and half the handle. That will make things extra crappy, and you'll be really mad that you just wasted it.


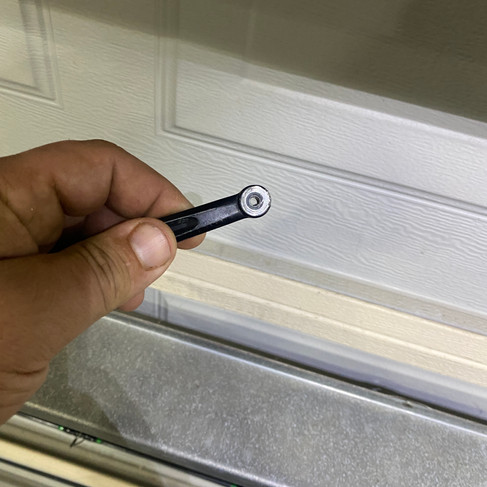
Next, I used a 15/64 bit to get the handle to the appropriate diameter for the new post. Unfortunately, the size was not in the instructions, so I had to use my calipers to verify. This is where my mistake from earlier was fixed. You're upsizing the hole, so if you went a smidge off, you'd be able to get it straightened up. Remember how I said I went only halfway down? That left the backside of the hole in the same centered spot. I lined my drill bit up and went down through the center. The upsize covered my mistake and kept the post where it needed to be.


After cleaning all the burs away, I installed the post (short side in) and secured it with a washer and screw. The washer might not have been needed, but I felt that the diameter of the screw versus the hole was too close. The washer took care of my worry and secured it completely. Next, install the bearing into the bottom of the handle and put it on the post. When you get it about halfway down, put the top bearing and screw into the handle and slide it the rest of the way down. You might need a small flathead to put the bearing on the post. Finally, tighten down the retaining screw and check for movement. If it's good, install the outer cover and marvel at what you've created! If there is some play, install a washer/spacer.
It wasn't nearly as bad as I put it out to be in my head, and I anticipated it to be a much more difficult task, but I was complete in about 30 minutes. The biggest tip I can share is being careful and taking your time.
I also decided to change my handle on my Penn Conflict 2 reel. I removed the outer cap, bearing retaining screw, and pulled up the entire assembly. I installed the new knob in the same way as before, but I had significant lateral play in it this time. This is where the spacer that comes from Gomexus came into use. The lower bearing sits right where it should. After you get it down, drop the spacer onto the post, then the bearing and screw. Once you tighten the screw, check again. I only had a little play after that, so I added one of the shims they provide, and it took care of the problem. Total time to change, 6 minutes.
The new knobs are excellent on these reels. I love it on the Daiwa and feel the difference when reeling. I have complete control through each motion, and it's more comfortable. I'll need to change the knob out on here soon. It was worth it.
Hopefully, you've read to this part because this is where I tell you the next fun thing that Gomexus is coming out with. They are making a direct fit knob and handle assembly for the Penn Series reels. In the near future, you will be able to change out the knob and handle in one motion instead of taking it all apart and rebuilding it. The total time to change will be less than 5 minutes. If you've ever considered changing out the knobs/handles, they will have you covered!


コメント