Hold my beer and watch me renovate this....part 1
- Brian Demo
- May 19, 2019
- 5 min read
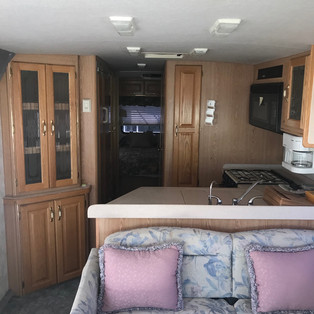
If you read the first installment (or just already know the story) you know that we decided to do a full blown renovation (to us) on Rex. Neither Jennie nor I have ever done something like this before but *Insert Full Metal Jacket Joker voice* "I've seen a little on T.V." Ah, I probably shouldn't have went there.....I digress (as you'll see I do a lot in my writing). So we had to take the below images and make it how we wanted. I don't think that i've ever been so thankful for Christmas tools in all my life looking back. Ok, here we go.
Out came the driver and passenger seat. This was a little tricky as I found out (later that is) the passenger seat nut securing it to the pedestal where it mounted was coming loose all of the time. Turns out that the cotter pin had sheared and gone the way of the dodo. Now imagine a 250 lbs man sitting in a chair that has the one thing securing it to the pedestal removed and decides to sit in it to "rock it free" and what do you see? If you said me falling down backwards towards the steps and nearly out of the RV cursing and screaming like a banshee then you'd be very correct! Only thing hurt was my pride....that time, but the seat was out!
Next came the couch and drivers seat. Drivers seat came out no problem! Lesson learned from the first one, remove the four bolts into the deck and life will be easier. Thankfully those bolts were secured into a welded in receptacle under the fire wall so much easier to remove. The couch was in two sections and bolted down to the floor with a couple of bolts and nuts. Easy peasy to get those up and out. Took me a whole 10 minutes and it was a pile outside the RV. This sadly gave me false hope as I was thinking that everything was going to go that smoothly!
As we started the carpet removal things got interesting. Did you know that whoever has the staple gun when doing carpets apparently likes to use ALL OF THE STAPLES?! Yeah, we didn't either. There was literally a staple nearly every four to six inches apart holding down the matting beneath the carpet. Words cannot describe the shear amount of pain and suffering it took to remove these with needle nose pliers when the shovel (yes, I used a shovel to remove it because it worked!) wouldn't pull them up. When we got to the kitchen island, we held off as we learned yet another lesson in RV creation. They lay the carpet down first and then put in the furniture/counters/bathroom items/bedroom items/everything! This created a little bit of an issue with the seams and corners as we had to cut them as closely as possible with carpet razors. It was tedious but pretty quick work with a sharp blade.
The cabinet in the corner unfortunately would not serve a purpose for us. It was too small for a pantry and was taking up some valuable useable space we had ideas for. It was my first cabinet demolition and decided to do it the smart way. Find the screws and remove them. Well.....that worked.....for about 10 minutes. When it was assembled, the refrigerator was not installed yet so there were screws in the back of the cabinet holding it in. I contemplated removing the fridge for about a microsecond before the big hammer came out. It thankfully fell down with out ripping the wall off. I gotta give Rexhall credit here as they truly did a great job assembling things in the rig. There were more screws, staples, and glue on things that I found than would be minimally necessary. I appreciate that they took the time to actually make this stuff safer and last.
So now you're probably asking how did I get the screws out of the wall without completely destroying the wall itself or taking the fridge out? Why with a rotary tool of course! Yes I cut the little buggers off and ground them down to make sure no sharp edges were there. I worried that the heads may fall off after this but found that they were happily snug up against the fridge. So that was actually a decent course of action.
The kitchen floor was a whole different kind of monster. It was super glued down using the hardest glue substance available to the team at Rexhall. This stuff shocked me how strong it was. Yes, I ended up using a pickax because none of my chisels were long enough to lift the flooring up. With that, the one chisel I did use ended up taking a bit of the subfloor with it so that was not a good set of tools to be using. Took about and hour to get this little block of hardwood up and out of the rig. With the pictures below, you can also see what I was talking about with the carpet. It goes under the walls and components. There was a lot of cursing involved in removing those little fibers.
The process was also completed through the bathroom and bedroom. So I know i've made two references now to the carpet being under everything and I'm going to show you one more example of this. Yes, it was under the toilet and around the ring to the black tank. I wasn't thrilled about that either. Yes, I was the one who had the honor of cutting that out after removing the toilet that had been in there for 20 years. The carpet thankfully came up with no issues (minus getting it out from under walls) and we were done with easily the dirtiest job of the entire renovation. The previous owners did an amazing job keeping this rig clean! I expected so much worse after 20 years of use but was proven very wrong.
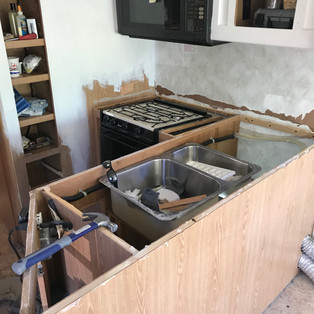
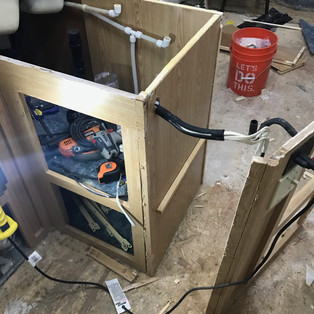
Onto the kitchen for some super fun demolition! Jennie got the honor of smashing the countertop. We started out by a little chipping away only to find that it works so much easier with brute force hammering. The counter was out in a whole 5 minutes and this is where we ran into our first "what should we do with" moment. The right side of the cabinet completely cut off a straight shot to the bedroom/bathroom. It also clogged up the way to the corner where we had just removed the corner cabinet. When we started looking at it, the storage in the section was just not enough for pots/pans/items so it had to go. The only part that was concerning was there was a power switch here for the electric water heater and the outlet for the coffee pot that came with the RV (we ended up using the outlet, more on that later). I personally hate working on electric items. I've been shocked enough times in a helicopter to know that we are not friends and probably never will be. In the end, I faced my fear and made it work nicely. We cut the end of the cabinet completely away and would put a blank board there to serve in its place (not the one pictured, but a 1/2" plywood piece). While that was going on, Jennie had started throwing paint up on the walls. It was coming along nicely.
This is where we started to transition from our "symphony of destruction" (name that band) to the rebuilding. There was a lot of investment in motrin and water after the couple of days this took to get through. The surprising part of this was that it took less than a week for the total tear down of the rig. We were looking to be ahead of schedule on to get out on the road full time. Well, we though we were ahead of schedule.


Comments